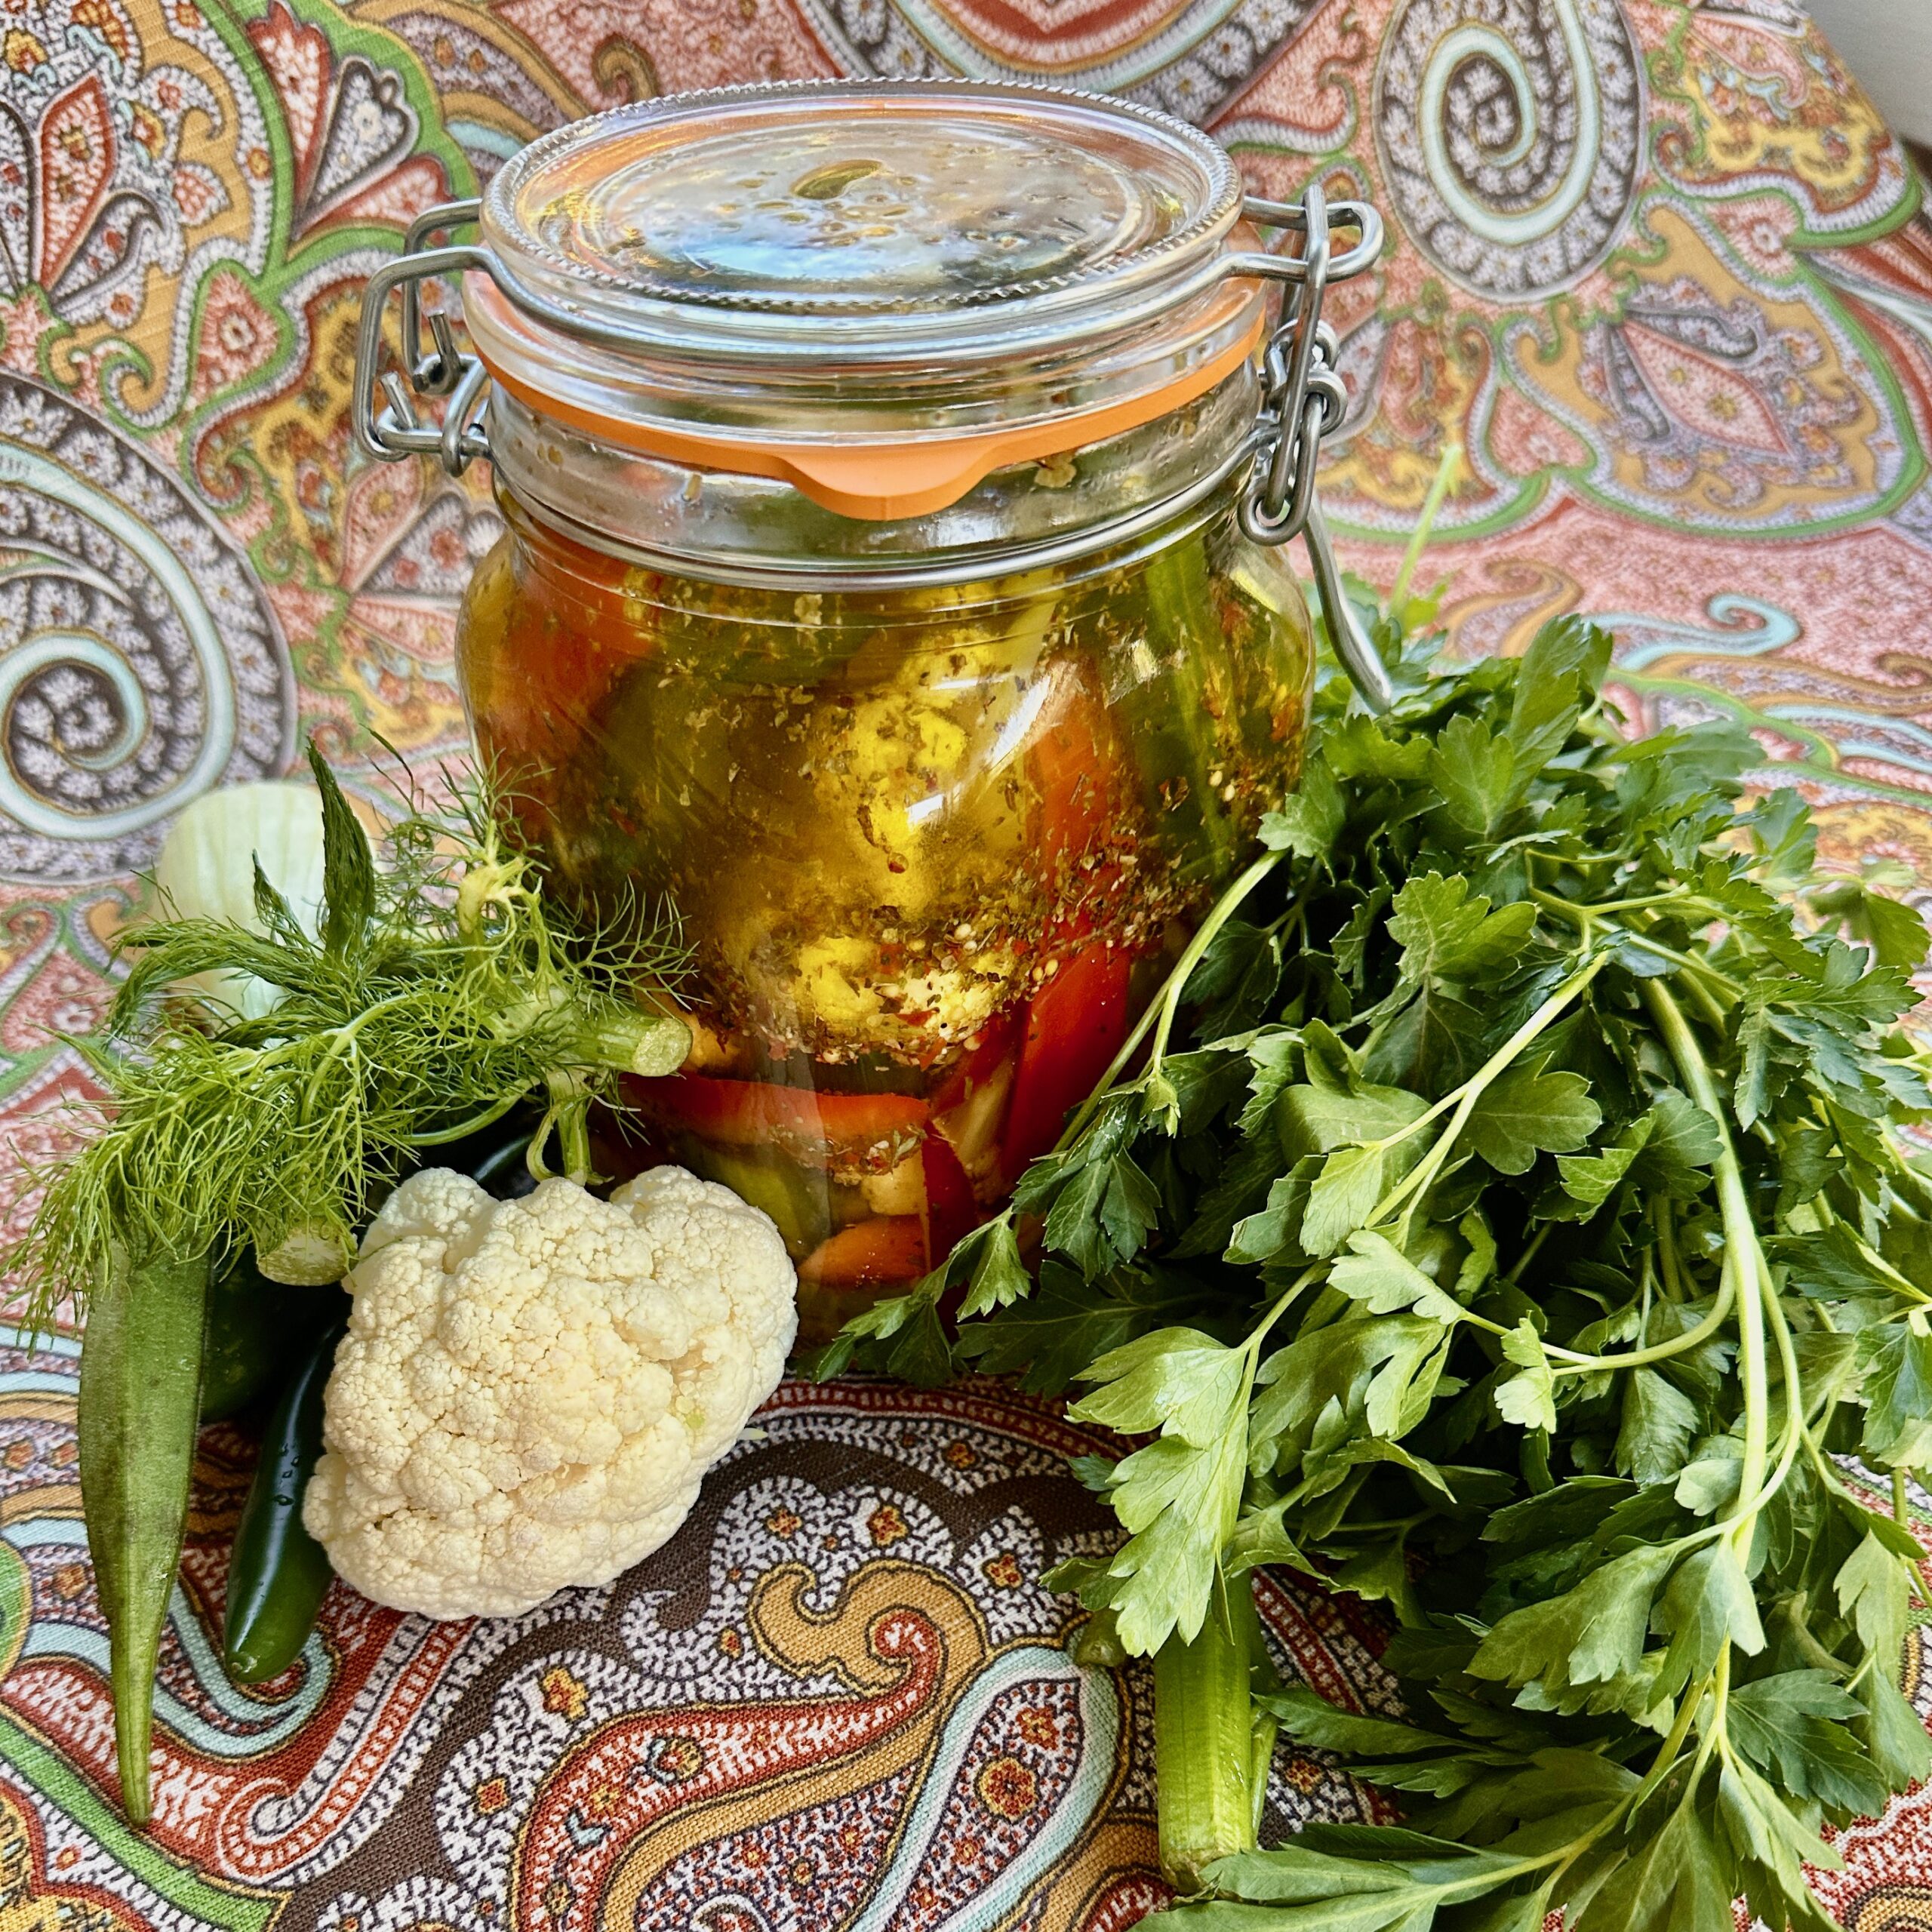
Spicy Honey Roasted Peanuts

These quick and addictive spiced sweet Spicy Honey Roasted Peanuts, keep well but rarely last long. Perfect for a treat or a cocktail hour

Ingredients

  • 16 ounces peanuts, dry roasted or roasted and salted, either is fine

  • ⅓ cup honey

  • ½ cup granulated sugar, divided

  • ½ teaspoon salt (plus an addition 1/4 tsp as a garnish at the end optional)

  • ½ teaspoon cayenne pepper

  • 1/2 teaspoon sweet smoked Paprika

  • 1/4 red pepper flakes

Directions

  1. Preheat oven to 300 degrees F.

  2. Line a rimmed baking sheet with parchment paper or a silicone mat

  3. Place the peanuts in a large bowl.

  4. Microwave the honey in a medium bowl for 30 seconds (it will begin to bubble).

  5. Remove from the microwave and stir in ¼ cup of the sugar, the salt, paprika and cayenne pepper.

  6. Immediately pour the mixture over the peanuts and stir with a wooden spoon until they are all coated with the honey mixture.

  7. Transfer the peanuts to the prepared baking sheet and spread into a single layer.

  8. Bake for 20 to 30 minutes, stirring every 5 minutes, until they begin to turn a golden brown.

  9. Remove from the oven and allow to sit for 2 minutes

  10. Then stir to loosen the peanuts and sprinkle 2 tablespoons of the sugar and crushed red pepper flakes over the peanuts and stir to coat evenly.

  11. Return the peanuts to the pan in a single layer and sprinkle with the remaining 2 tablespoons of sugar and 1/4 tsp of salt (optional) and allow to cool completely.

  12. Once cool, break apart any peanuts that have stuck together and toss with any loose sugar. Store in an airtight container at room temperature for up to 2 months.

    Adapted from

    https://www.browneyedbaker.com/spicy-honey-roasted-peanuts/

My Latest version of the traditional Easter Pizza Rustica or Ham Pie

As some of you know I am on Tiktok these days on my original account @Frank_MentorSF, and my newly launched, more food focused @KithchenBearSF. While I work to get @KitchenBearSF up to its minimum followers to go live, I go live from my original one and weekly noon 12:00 noon PST on @foodtoktv collaborative account.

On Saturday I took a rare few hours and went live on my account to make my annual “Ham Pie” that I do most easter weeks. I have blogged about this in the past, but sharing below the latest version of the recipe. See this post for more step by step https://bitetheroad.com/easter-ham-pie-aka-pizza-gaina/ .

Full Recipe for the Filling- (enough for 4-6 pies depending on size)

1/2 lb whole milk insalada (or Insalata) ricotta, aka Ricotta Salata  (Firm salty ricotta cheese. – you can substitute any of your favorites or what you can find locally)

◦ 1/2 lb Pepperoni (Use the traditional sticks or the larger slicing one.)

◦ 1/2 lb Prosciutto (optional)

◦ 1/2 lb HOT Capicola or Hot Soppressata,

◦ 1/2 lb hard salami

◦ 1/2 lb Genoa salami

◦ 1/2 lb Procuittini (You can substitute this with any other pepper coated ham they have)

◦ 1/2 lb Abbruzese

◦ 1 lb Basket Cheese if available or use fresh Mozzarella cubed

◦ 1/2 lb Provolone (Other recipes use ricotta Salato etc.) or both

6 – 12 Large Eggs ((see notes for quantities))

For The Dough – 3 – 8” pies

• 1 tsp Ground Pepper (or more to taste for dough)

• 6 large Eggs

• 3/4 cup (or 12 tbsp) Shortening

• 4 1/2 cups All purpose flour

• 1 tsp Salt

• 1 tsp Grated cheese (Parmesan) (for dough)

• 2 tbsp ice water (as needed)


Read these Notes first

  • Depending on where you live – some of these meats won’t be as available. Its totally fine to switch them out for your favorites or use more of one than the others.
  • When buying your meats and cheese – you will save time by asking the deli to slice it in 1/4’ slices for you.
  • The filling for the full recipe will make 1- 9 inch pie- (in a springform pan) and 1 foil or 3 –  8’ in foil round pans. depending on how much you fill them. I also like to use foil loaf pans.
  • I often make the first batch of dough, knowing I will have leftover filling. Then a few days later make another batch for the freezer. When freezing, cool, wrap in plastic, then foil then place in a ziplock bag
  • By volume, the foil pans take about 6-7 eggs worth of the whisked eggs and the springform will take up to 12 – 13 eggs depending on the size eggs you use. (Lessons Learned – have extra eggs handy just in case)
  • If you use a springform pan – be sure and give it a foil “condom”  around the bottoms and bake on a sheet pan in case it leaks

Pre-preparation

  • Cut all the meats and cheeses into small cubes. 1/4 to a 1/2 inch mix. You can do this several days before in resealable bags or containers.

Making the Dough

    • You can make the dough several ways.
      1. My usual method is in a large flat bowl (or on your counter if you have the room)- sift together flour and salt. Add eggs, ground pepper and grated cheese. This also works in a stand mixer with the dough attachment.
      2. If you use a food processor – its super fast and the dough will be softer. A few tips  include dice up the shortening and don’t over mix. If you make the full version, you’ll likely have to finish mixing it by hand, but if you use the half batch,  you will be able to process it right in the food processor
    • Add in the shortening and work in quickly. Use a pastry cutter if you have one.
    • Crack and break up the eggs. Add the eggs to the flour mixture and mix, adding up to 2 tablespoons of iced water as needed to bring the dough together.
    • Dump it on the counter and knead it until it comes together and form into a ball. DO NOT OVER WORK. Wrap in plastic or cover until ready to use.
    • You have two options now:
      1. You can divide the dough in 4, shape into discs and wrap and chill for 30 min or overnight  or
      2. Divide the dough and roll out and fit into your pans, pressing up the sides. Cut off at any extra to save as decoration on the top.

For the filling (wet mix first)

    1. Crack and whisk the remaining eggs
    2. Add pepper, grated cheese
    3. You can add 1-2 tablespoons of the Basket cheese (if using) and gentle loosen it into the batter. This will add some moisture when cooking.

Assembling the Pie

    1. Preheat your oven*
    2. Roll out the dough, large enough to extend beyond your pan several inches as you will want the sides to hang over. You want it thin enough to be flexible
    3. Using either a 9in spring form pan (or an 8 inch one will do – but use less of everything) or simple foil cake or loaf pans
    4. Lay the dough in the pan and gently press into place and make sure all the corners and sides and flattened smooth.
    5. Sprinkle some grated cheese ( about a tablespoon) on the dough at the bottom of the pan.
    6. Place 2 cups (for foil pans) or 3 1/2 – 4 cups (for spring form pan) of meat and cheese mix in each prepared pan and spread it out. It should be no more than 3/4 of the way up the sides.
    7. Pour the wet batter over the meat and cheese. Using the back of a wooden spoon gently mix in. Essentially you want to barely cover the meat mixture. (If you run short of eggs, whisk up a few more and top off)
    8. Take the leftover dough and add any decorative topping you want (i.e. a cross hatch or cut out shapes), flute the edges.
    9. Brush with an egg or cream wash
    10. Sprinkle with more grated cheese
    11. Bake in a preheated oven* 350 degrees for 60 – 75 minutes
    12. When they are a golden brown and a toothpick comes out clean. Take them out of the over and let them cool on a rack, in the pan until cool to the touch
    13. Once cooled some, remove them from the pan  and let finish cooling on the rack (remember they will still be hot inside)
    14. You can serve these warm, room temp or cold.
    15. Once fully cooked ns cool – wrap in plastic wrap, then foil to keep. They freeze great!

*Baking Temperature & Times

  • My mom prefers to use 350 degrees for 60 – 75 minutes or until the toothpick comes out dry for the foil pans (my oven was dead on at 60 minutes. (For the larger springform – plan for another 20 min).
  • My original version https://bitetheroad.com/easter-ham-pie-aka-pizza-gaina/
  • Several other versions I have tried and liked include
    • https://cookingwithmamalombardo.wordpress.com/2011/04/23/another-easter-classic-pizza-gaina/
    • http://www.afamilyfeast.com/easter-pie/
    • http://www.food.com/recipe/pizza-gain-aka-pizzagaina-pizza-rustica-italian-easter-ham-pie-293899#top


Keto Chocolate Chunk Biscotti

I am a huge biscotti fan and I have hate paying the price for them in the store when they are super each to make. I do a bunch of flavors, but one of my “go to’s” is a recipe for mini M&M Chocolate Marble Biscotti that I found some time back. But with friends and family members eating more Keto or gluten-free I have started to play around with recipes and this one got a remake this week.

So I went from this version with all the sugar and flour:

To a new version that uses almond four, sugar substituted ingredients:


With a few minor tweaks, I was able to get it working to rave reviews. But first, you have to have the ingredients. So I used these alternative brands (I don’t have a relationship or affiliate with any of them) but they are all easily available at both Safeway and Luckys grocery stores. in my test batches, I found I liked the chocolate bars chopped up better than using the Lily’s chips.

Here is the recipe:

Ingredients

  • 1/2 cup of margarine softened (You could use butter but it will affect the softness of the biscuit – but add more flavor)
  • 1 cup granulated sugar substitute – I used the Monkfruit version
  • Two large eggs
  • 1 teaspoon Vanilla extract
  • 1 pinch of salt
  • 2 -3/4 cups Almond Flour ( with up to an additional 1/4 cup if needed on the side)
  • 1 teaspoon baking powder (you may find you can use less)
  • 1 teaspoon baking soda (you may find you can use less)
  • 1 -3/4 cups sugar-free chips or chocolate bars chopped up
  • 1/4 cup unsweetened cocoa powder*
  • 1 cup slivered almonds (optional)
  • 2 tablespoons instant coffee granules (optional)
  • 1/2 teaspoon Almond Extract (optional)

To make:

Preheat over to 325°F.

Cover two cookie sheets with parchment paper ( if your sheet are large you can do two bars at once but they will spread some)

Note- this batter is soft enough to do by hand or hand mixer if you do not want to use a stand mixer

Steps:

  1. In a large bowl, cream margarine and sugar substitute until light and fluffy;
  2. Mix in eggs and vanilla.
  3. In a medium bowl combine flour, baking powder, salt, and baking soda;
  4. blend into creamed mixture. Note: The dough will be much softer than the traditional version.
  5. you may want to add in some extra almond flour here if needed.
  6. Stir in 1 1/4 cups of chocolate pieces, mix well
  7. Layout plastic wrap on your counter and scoop out the dough and shape into a ball with your damp hands.
  8. Divide dough ball in half. Put one half back in the bowl, and leave one on the counter.
  9. Add the cocoa powder and coffee granules to one half of the dough in the bowl. Work together until the dough and powders are mixed. The cocoa powder will make the dough stiffer as well.

Making the marbled look

  1. On the plastic-covered counter ( you can also use almond flour on the counter if you prefer not to use plastic). Gently knead the  “white” dough and shape it into a wide log. Put aside.
  2. Do the same with the “chocolate” dough and gently knead into a similar shape
  3. Place the two logs together, one on top of the other, and knead them three times together to form a marbled effect.
  4. Divide the dough into two pieces again  and roll out as two similar shaped logs about 2 inches wide

Baking:

  • Place each log on a cookie sheet, (leave room around the log as they will spread in baking).
  • Bake for 20-25 minutes ( Almond flour burns faster than regular flour – so keep a close eye on it. In my oven 20 min was perfect)
  • Remove from the oven and let cool in the pan for 15 to 20 minutes
  • Carefully remove from the pan to a cutting board (They will be soft! )
  • Using a serrated knife, slice logs into 1/2 inch slices (it may yield anywhere from 12 to 15 slices per log depending on how you cut them)
  • Rearrange them back on the cookie sheet cut sides down.
  • Bake an additional 10 minutes, Turning the over halfway through is optional
  • Turn the oven off and let them sit in the oven for another 5-10 min
  • Then remove from the pan and let them cool on a rack. store tightly covered

Other tips

  • Wrap each log in plastic and place in the refrigerator fo 15 min – 30 min before baking to chill helps to slow the spread when baking.
  • You can freeze the logs until ready to bake in the future, just let thaw 10 -15 min before baking.
  • Adding the coffee granules is optional. If I don’t have any, I don’t use them. Don’t use ground coffee.. it will be too bitter


Lemon Bars with an extra crunch

As promised;

For the Crust, you will need                 

8-9 graham crackers (each 2 1/2 by 5 inches)                  

1 cup of nuts. I used raw pistachios, which I toasted off first. But Almonds and Pecans also work.

Sugar  

    2 tablespoons regular fine white sugar

    5 tablespoon Turbinado              

3 tablespoons unsalted butter, melted

Pinch of salt                  

For the Filling                 

1 8-ounce package of cream cheese, room temperature                  

1  8-ounce container of marscapone cheese (or substitute another 8-ounce package of cream cheese)

3/4 cup sugar fine white sugar                  

2 large eggs                  

Pinch of salt

Finely grated zest and juice of 1 lemon (2 to 3 teaspoons zest and about 3 tablespoons juice). If using Meyer you may need to check for tartness.  This also works for Orange and limes

DIRECTIONS  

Make the crust: Preheat oven to 325  degrees. 

This is the Lemon version with the extra sugar layer crust

This is an orange version with the single step method crust

Note – this crust is made in two parts!

  • Line the bottom and sides of an 8-inch square baking pan with aluminum foil, leaving an overhang on all sides. You can fold the extra foil over the edges.
    • I don’t recommend using a foil pan for this. They are too thin and bend when moving. You want the solid stability of the hard pan. 
  • In a food processor, blend 5 graham crackers, 1/2 cup of nuts with 2 tablespoons of fine sugar until finely ground; add 2 tablespoons of the butter and pulse until it looks like damp sand.
  • Transfer the first level of crumb mixture to prepared pan, and pat in gently. Bake 6-7 min

Second layer

  • In the same food processor, blend remaining 3 graham crackers with the remaining 1/2 cup of nuts and 4 tablespoons of turbinado sugar until finely ground; add the remaining 1 tablespoon of the butter and pulse until moistened.
  • Add the layer to the prebaked layer.  Pat firm, sprinkle on the remaining 1 tablespoon of turbinado sugar.  Bake until beginning to brown, another 7- 10 minutes. 

While crust is baking, Make the filling:

  • Place the 16 ounces cream cheese in the (wipe processor bowl clean first) food processor; blend until smooth. Add sugar, eggs, lemon zest, and lemon juice; blend 
  • When ready, remove the crust from the oven and pour the mixture on the top layer over the hot crust in pan; smooth top.
  • Return to oven, and bake until set (filling should jiggle only slightly when the pan is gently shaken), 35-45 minutes.
  • Remove from the oven and cool completely in pan.
  • When cool, cover very loosely with plastic wrap; chill until firm, at least 2 hours (and up to 2 days).
  • Use foil overhang to lift cheesecake out of the pan. With metal spatula, lift cheesecake from foil; cut into squares.
  • You can sprinkle confectionary sugar or top with candied lemon peels etc.

SaveSave

SaveSave

SaveSave

Oatcakes with a Protein Punch

Who would have thought adding protein to my snakes would be so good.

So life has had me in full out overload mode for a few weeks so I have been a little behind in my posting. Today I am hoping to catch up with a few over the week.

One of the fun finds I came across was a great recipe for a protein-based, oatmeal version of “pancakes” I wrote about them on my blog post on my Engage blog which had a theme that day about “How A Middle-Aged Workforce Can Keep Up With Millennial Coworkers“. I found this recipe in the  March Issue of  Men’s Health Magazine for Blueberry Oat Pancakes, the primary ingredient is plain oatmeal with added protein. While dense, when whipped up on a Sunday night, cooled and wrapped – they freeze well and I can grab them on my way out the door.

Cold or toasted, maybe with a bit of peanut butter on them, they are a lot better than skipping a meal or grabbing something on the road. I found a similar version here, but the March version as follows is updated more and better tasting.

Since then I have made it a few times and made some additional revisions:

I am sharing my adapted version of the March version below:

  • 3 cups old-fashioned oats (any will do I just happen to use this one)
  • 3 scoops of Vanilla whey protein powder (I use a few versions and mine tend to be lactose-free. I also found that those with “pea” base didn’t lend this a very good aftertaste. A little too “green for me”
  • 3/4 teaspoon baking powder
  • 1 pinch of salt
  • 3 bananas
  • 3 large eggs, plus 6 egg whites (I used the pre-made version from the store for this)
  • 3/4 teaspoon vanilla extract (I would use more at least a full teaspoon)
  • 1 teaspoon cinnamon
  • 1/4 teaspoon of Nutmeg (optional)
  • 1/4 teaspoon of All Spice (optional)
  • 1 cup fresh or frozen blueberries
  • 1 teaspoon coconut oil or butter for brushing the cooking surface

To Make: 

  • Using the blender or a Ninja machine; blend together everything but the blueberries and the oil/butter. It will be “batter” like texture.
  • Using a non-stip skillet, brush with coconut oil or butter and ladle about a 1/3 of a cup of batter (this will make about 12 cakes).
  • Cook 2-3 minutes per side.
  • Cool (or eat), package in zip bags and freeze or put them in refrigerator

Note: this is a simple example of how to snack or eat on the go – it’s a flexible batter – so change it up! So while recipe says a serving is 3, I found 1 -2 to be perfect.


SaveSave