From Writing to Reading to Cooking to Hiking…

And the weekend begins…

While it wasn’t intended to be this weekend ended up a full one. With several creative writing activities in the process, including new edits to the TedXProvincetown script due next week, a big meeting on Tuesday to prep for. I also have our monthly book club and trying to get some time to get Paul out and about while the weather was nice.

What to do on a day off?

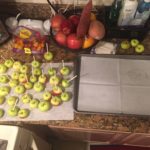
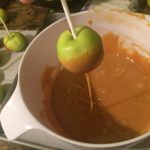
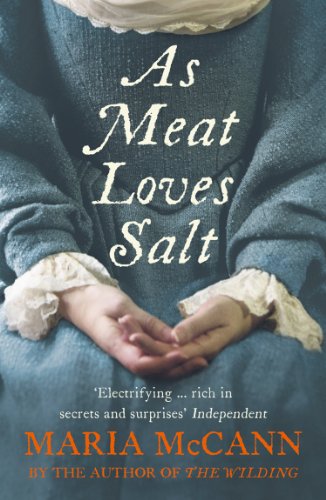
Part of the reason I like book club is the research behind the books. So for me, a “Food Lab” is an essential part of the reading.  This month’s read was the prompt for a few vintage themed recipes to go with the book “As Meat Loves Salt”.

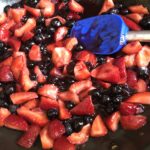
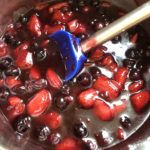
As a “just in case,” I also figured I would do my take on a parfait with Honey Citrus Ricotta & Marscapone cheeses layered with simmered honey citrus blueberry and strawberries. These would be perfect or as toppings for either of the other two dishes in case the dishes failed or were too dry (and I happened to have the fruit handy), so they were the first to get made so they could set up overnight.


In keeping with the Great Britian/16th-century theme,  I found a great cookbook well while at the bookstore over at Fort Mason that had 16th and 17th-century English recipes reinterpreted.

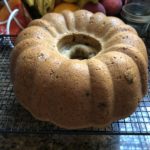
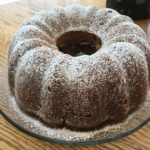
One of several that caught my eye included a Sour Cream Spice cake.  Originally intended for raisins,  I did switch them out for dried cherries but it was the only “change” I made. I found a typo in the recipe that confused cardamon and cinnamon, so I opted with cinnamon.

The Review:

Folks liked it. Super dense and moist, with a subtle spice taste. The batter is thick and must be over the size bundt pan I have so as with some older recipes I already do with. Next time I would only use 2/3 of the batter. It was too full and would have meant a much longer bake and be super dry. As it was this still was a little moister towards the inner ring. On Sunday, I toasted it for breakfast and really liked how that tasted with some salted butter on it.


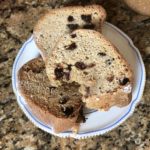
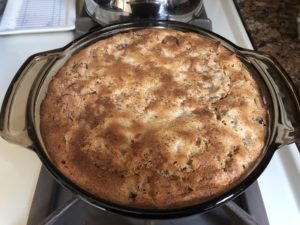
The other dish was an Apple Noodle Pudding aa s backup if the cake was dry or didn’t come out. This version of a “pudding” uses egg noodles, apples, and dried cherries as its base with butter and sugar and flour. Once cooled, all it needed was a sprinkle of powdered sugar.

The Review:

Well, let’s just say – the bowl came back not only empty but CLEAN! I definitely will make this again and experiment with different flavors combinations. I am thinking rosemary and pear next time.

As luck would have it all of them came out quite good but ya gotta love those “Plan B’s” .

Sunday was a casual day with me in my head drafting, so Paul and I took Dino up to walk around Buena Vista Park.

Once we hadn’t done in way too many years before heading home for some downtime and before I grilled up some dinner and was back at it.


SaveSave

SaveSave

SaveSave

SaveSave

SaveSave

SaveSave

SaveSave

It’s apple time but not just plain apple but “Candied Apple” time!

It’s apple time but not just apple but “Candied Apple” time!

One of my favorite times of the year is the September – November period. I always liked the ending of summer and the start of the fall. The leaves changing, the colors, the smells, the slight coolness in the breeze. One of the few things I miss not living in the east coast any longer is a certain smell in the air that comes from just the right combination of rain, new growth, mulch, warmth, and dampness. Every so often I will catch a quick moment of it here in San Francisco first thing in the fall morning.

But with the cool weather comes apples.. lots and lots of apples. OK – you bakers can make all the pies and cakes you want. But my favorite way to enjoy apples is smothered in caramel, chocolate, and some extras. Yes, that’s right. It’s candied apple season and not just any apples – it’s the time of the year the little hybrid Lady Apple is at its best. This combination packs the tartness of a crab apple and the sweet of a granny smith in a 3-bite snack. I was looking for other images and found these it promoted me to re-post the how to on them for folks.

ok so this isn’t rocket science here folks:

All you need apples, caramel, chocolate, sticks, wax or parchment paper, plastic wrap and some extras like nuts, sprinkles etc.

Check out the grocery stores. It used to be, you could only find these at places like Whole Foods. But now I can find them pretty much anywhere starting September. But they have a short season and to be honest can be expensive so plan accordingly.

Wash and dry the apples. I leave the stems on – but some folks like to remove them. While they dry – start the next steps:

Depending on the kind of caramel and chocolate you use, you will need to prep them. For the caramel, I use a large box I get from either Amazon or Smart & Final, but in a pinch, you can buy regular packaged caramel squares and unwrap them individually. (that just takes too  much time). In either scenario cut the caramel into 2-3 in cubes and toss in a microwave safe bowl. Something with a handle as the melted caramel will be super hot. Set it aside.

Then do the same with your melting chocolate. Milk or dark – it’s all your preference. Sometimes I get mine at Safeway and use the packages melting chocolate, other times I head over to Marin or Berkeley to the Cake and Candy supply store for bags of it. I also melt mine in the microwave, so no fussing with extra pans.

Now lay out an assembly line.

Clean & dry Apples => Candy Sticks => Hot pad for Carmel => Hot pad for Chocolate => Bowl for toppings => Sheet pan covered in parchment or wax paper


Now stick the little suckers, stem side up.

Next, put your caramel in the microwave to melt in 40 sec intervals. Stirring in between. DON”T over heat it. Also, DON’t let any moisture and water get in it. Use a dry spoon to stir. You want it like liquid molten bubbling lava, and almost as hot!

Now in small batches, working quickly, dip, rotate in the hot caramel and twirl off the excess in the hot caramel. (This is why I use a deeper bowl for this part) and place on the covered sheet pan. Once they set up a few minutes. Check for shape – the caramel will be soft enough to smooth and shape if you get a few irregular bumps. Keep in mind – when it cools it will get stiff. All you need to do is pop it back in the microwave and reheat.


Now you do the same with the chocolate – put your chocolate in the microwave to melt in 20 sec intervals. Stirring in between. DON”T over heat it. Also, DON’t let any moisture and water get in the chocolate. Use a dry spoon to stir.

After you twirl off the excess chocolate this is the time to roll it in any toppings and then place back on the sheet pan to set.


If you feel the chocolate is cooling off or you are running low – just add more and/or reheat it.

Once they are dry to the touch, you can wrap them in the plastic wrap or buy the small food gift bags from the store. Close with a simple tie and you are ready. They don’t need to be kept super cold – but keep them out of direct sun.